My Wonderful Followers - Thankyou :)

Monday 24 August 2009

I Love Your Blog Dahling! award

One of my faberoonie friends Lisa 'The Promarker Queen' has given me this fabulous award. We're meeting up for a crafty session in only a few weeks time and I can't blooming wait. There is nothing quite like getting together with the girls and crafting and nattering and just having a jolly good old time

Thanks sweetie for this wonderful award and I can't wait to meet up with you very soon :)

Now this is a brilliant award as the only 'rule' is to pass it to other people so I shall have a ponder of whom to give it to and will get back to you.

In the meantime I am going on holiday tomorrow. We're going camping just by Weymouth for a few days and on the way down we're going to pop in to see a fabulous friend who needs a bit of cheering up.

In the meantime I placed a little order with the Glitterpot for some gorgeous Basic Grey papers I have been after so Mr. Postie will hopefully deliver whilst I am away :)

Crafty Cardmakers 2nd Challenge

It's Challenge time again at Crafty Cardmakers and this is the second DT card I have made. This week we have a colour wheel challenge. There is a great tutorial on there which Vix has done which gives some background on different colour schemes and we were asked to make a card using colours at the opposite end of the colour wheel.

I chose purple and yellow which are individually 2 of my favourite colours, but I have to admit I would have NEVER mixed them together in this way. This is why it's called a challenge ain't it?

First things first I decided to use a sketch for the layout from Di Hickman. This is the 2nd July sketch. She does 1 a week and they were the 1st sketches I was ever introduced to and thus the addiction began...... Di uses lots of bright papers like HOTP and DCWV and I love her style. She is definitely one of my biggest cardmaking heroes.

The base card is an A4 sheet of card folded over. The yellow dotty paper is HOTP from a Citrus pad from QVC. The rest of the papers are handmade textured ones, you know the ones you buy because you think they are a good idea at the time but actually you haven't really used them???? Go on, admit it, you've got them in your stash haven't you?

Anyone who knows me, knows I love butterflies and I have them everywhere, even tattooed on my shoulder! Sizzix brought out a range of Sizzlit 'Build a Butterfly' dies and I had to have both designs, but you know I have never used them before now. I knews I wanted to use them for this design as I felt the layering of the colours would work perfectly. Afterall, when you see butterflies they are every colour of the rainbow and they work perfectly together don't they?

Using the different dies in the pack I cut out the pieces from the relevant papers and ran them through my Xyron sticker maker. I love those for intricate die cuts as otherwise it would have been very difficult to glue them together. I raised the upper wings on 3D foam for dimension. The flowers are Primas, the gems are from Poundland and the sentiment is a rub on from a Let's Make Cards pack. The Cadbury's purple ribbon was from a grab bag from Ebay some time ago, I just love the richness of the colour.

As a keen participant at 365 Challenges I have entered this into an older challenge for Day 26 which was to use your least favourite colours on a card. Definitely not my least favourite colours but not a colour scheme I would have used and can't see me using it again. Mind you, it reminds me of a pansy so it definitely works as a colourscheme...... maybe I should go for more subtle hues..... but maybe I won't, subtle? that just wouldn't be me LOL

It would be lovely to see your creations if you participate in this challenge at Crafty Cardmakers. I have enjoyed seeing the cards for the 1st challenge and it was fabulous to see so many people join in especially the newbies to blogs and card challenges. I hope you come back and join in the fun :)

Friday 14 August 2009

Circle Of Friends Award

I have been very fortunate to receive 2 awards recently and have only just got round to picking them up.

The Circle of Friends award is from Crafty Linby who is a fellow 365 cards participant.

I have also been lucky to receive the same award from my fellow forum, Facebook and 365 Cards buddy Jenny from Just Jenny's Little World. She is one of the nicest and most supportive people I have the pleasure of knowing and I hope one day we will be able to meet...... we nearly did but unfortunately a stamping show got in the way. One day Jenny, I'm sure we'll make it :)

Unfortunately since I started back to work full time I of course have not had so much time to make cards. August in particular I knew would be a bad month as we have a holiday, I've had a big commission and we have a family wedding at the end.
But, I'd far rather have less time for cardmaking and a full time job again as I needed to get some money coming back into the house. Paul is trying to make a go of being a self employed IT bod and I've said I will support him as much as possible. My wage will run the house so at least we are not going to be eating into the savings we had and I may even get some money to buy some crafty bits....waaayhay!

I do miss though being able to blog hop as much and feel like a big part of what I enjoyed doing has had to cease, but then I don't have as much time as I did before. Whilst I was out of work making cards was a creative way of coping and I am lucky that I have 'met' some wonderful people through my hobby, both online and in real life.

Anyhoo the terms of this award are:-
  • Make reference to the award and publish it.
  • Share 5 things you like to do
  • Disclose the rules
  • Share with 10 blogs
  • Inform each blog
Some of the things I like to do are:-
  1. Make Cards
  2. Meet my crafty mates for crafty sessions
  3. Cuddle up on the sofa with my hubby
  4. Spend time with friends and family
  5. Go on Holiday
I would like to give this award to the following people


Wednesday 12 August 2009

365 Cards Day 163

Day 163 at 365 Cards is all about trying a new technique - masking. I'm sure many people have already done it but I am not the best stamper and have never done it before so it was nice to try something different.

We are going to our friend Scott's 50th birthday party on Saturday and I needed to make a card for him. I made him a super card last year so had to try and top it. I made a sidestep card as I think they look fabulous but are actually really easy to make once you know where to cut and fold.

The stamp I used is Forever Friends by Papermania and originally only had one balloon. I wanted to do a collection of them so I could put the numbers inside a couple of them. Following the tutorial link on the post at 365 I used a couple of post its to mask the first full image an then played about with where I wanted the extra balloons. I coloured the image with Promarkers. I don't have many colours at the moment but I am really pleased with how it turned out. I just love that you can't see the brushmarks like you do with Marvy Le Plumes. It even makes my colouring in look good but I've got a hell of a long way to go to be as good as my friend Lisa, her colouring is brilliant, just look at the beauties on her blog here.

The main card is covered with a freebie paper from Simply Cards & Papercrafts magazine. The balloon paper, stickers and candles are all from the FF kit from QVC. The birthday sentiments are from magazine freebies. All these elements have been put on card to strengthen them and mounted on 3d foam. I used a littlwe mulberry flower in the hair of the bear and changed the colour with a Sakura glitter pen. The lettering is Doodlebug stickers that you apply glitter to which is very apt as 365 are sponsored by Art Glitter this week. I love glitter and any excuse to use it is fine by me ! LOL

Monday 10 August 2009

1st Crafty Cardmakers Challenge

This is my DT card that I have submitted for the 1st challenge over at Crafty Cardmakers for 'Flowers'

I have used an older sketch from Stamps & Smiles for the layout of the card. I have changed it from a DL size card to a standard A6 and you can see that it still works really well. I love to use sketches but always remember they are to be used as a rough guideline and most blogs will allow you to turn them around or adjust the layout slightly to suit your project better. You will find that as you take part in more challenges you will get braver and will have more confidence to change them to suit you better.

I have used a pale pink base card and the papers are all from a K&Co 6" x 6" pad by Tim Coffey called Young Girl. If you buy co-ordinate pads you can be sure that if you mix designs together that the colours will work. The ribbon style strip is cut from one of the papers in the pad and I have matted it only a layer or white card just to make the definition better between the 2 papers.

The big flower has been recycled from some silk gerberas I used to have in my bedroom. When you start cardmaking you will soon look at materials in lots of different places and see ways that you can use them in your cards. These days especially with spare pennies being tighter we can all see ways of re-purposing items and using them in this wonderful, but sometimes expensive hobby we have.

The flower laid on top has been made from one of the papers in the pad. A great way of getting more use out of your papers is to make your own embellishments by cutting around individual elements. In this case I have cut around one of the flowers and mounted it on 3D foam. This makes it stand up away from the silk flower. I have then cut out a centre circle from another flower, stuck some more 3D foam on the back and added it to the centre. This is called decoupage and gives your card more height and interest. As a finishing touch I have added some Stickles glitter and a clear glitter pen by Sakura to the patterns in the flower, any excuse to add a bit of twinkle is fine by me.

I hope I have inspired you to look at your patterned papers in a new light and make your own 3D layered embellishments. I hope you will take part in our 1st challenge and look forward to seeing your cards.

Sunday 9 August 2009

365 Cards Day 127

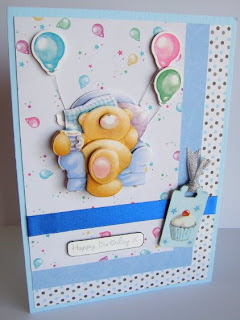
It's Paul's Grandad's 89th birthday tomorrow and we are going round for a little party today with other family members as considering he was so ill and nearly died in hospital it really is something to celebrate.

I have made this card using a fabulous Forever Friends kit from QVC. They had it as a TSV a couple of months ago and I really wantd it but just couldn't afford it whilst being out of work. One of my friends Helen lives in Warrington and they have a QVC clearance shop up there and she bought the lkit to offer to her forum pals. I snapped it up! It's a heavy kit and even with postage it cost £18.50, and absolute bargain for what is in there I can tell you.

I have used an older sketch from day 127 at 365 Cards for the layout. I am so behind on their challenges now :( I really want to try and catch them up but now I am working it feels like I am fighting a losing battle. I'll keep trying.

I used a pale blue sheet of A4 card for the base and the 1st spotty layer is from a FF decoupage pack. The second blue layer is from a HOTP cardmakers pack and the balloon paper is from the QVC kit. The ribbon is from my stash. The decoupage is to show Grandad chilling out in his chair. Since he has been home from hospital he has had to rest as much as possible as he developed a sore on his heel that ulcerated and it needs to get better before they will do the 2 operations he needs. The balloons tied to the chair are cardstock stickers raised on 3D foam. The sentiment is from the pack too edged with a little black ink pad. The chipboard tag started life as a horrible colour so I covered it with white card and used a Promarker to add colour to it. The cupcake is an embossed transfer which took a while to rub off the carrier sheey but has a lovely shine to it. I added some little star stickers to finish it off and a piece of silver ribbon.

Saturday 8 August 2009

Crafty Cardmakers

Just to remind everyone that the 1st Crafty Cardmakers challenge is on Monday and we're looking forward to seeing lots of people taking the plunge into the world of card challenges and all the fun it can offer.

We've got a competiton on there at the moment for some blog candy to guess the names of the 2 sponsors we have from some clues that have been dropped. They are both biggies in the cardmaking world and it is really exciting that we have such great sponsors so early on. Big up respect !!!

So come and join us on Monday !

Thursday 6 August 2009

New Baby Sidestep Card

My Mother in Law has asked me to make a card for a new baby girl for a friend of her's who has moved to Canada. She asked me not to make it too big or heavy as it costs a lot to post.

My friend Sarn recently made this style of card at a cardmaking class at The Glitterpot and shared the pattern of how to make it. It uses a piece of card 6" x 12" but as I don't buy much card of that size I decided to alter the sizes slightly and make it fit a standard sheet of A4. A little tweaking later and I'd altered it to fit.

The main paper is by Doodlebug (now only got a small piece left, boo hoo) The paper on the second layer is from The English Paper Company and the spotty one at the back is by K & Co. The cardstock stickers are by Doodlebug, the baby is a photo realistic sticker from MAMBI and the welcome to the world banner is from the same pack. The New Baby sentiment is from Lets Make Cards, the epoxy bubble message is Paperchase and the silver teddy peel off is Papermania.

I really like this style of card and will definitely be making more of this shape. It looks really effective yet is quite easy to do once you know where to cut and fold.

Sunday 2 August 2009

A Wedding Commission

My goodness, I have been a bad blogger lately. Since starting my new job on the 20th July I haven't made any cards but I have been working on this commission. I have been planning and making it most nights after I have been at work and had my tea. I have loved making it but have to admit I am glad it is finished so I get on with making other beautiful things.

I made a card like this last year for a work colleagues wedding and one of my friend's Karen asked to do something similar for people who are getting married in Sorrento in Italy. What a glorious setting for a wedding :)

The brief was to use colours of lilac and silver. I couldn't find my scribbled down instructions from making it last year so had to start from scratch. One of crafty buddies Jenny has asked for instructions so I have written them down stage by stage and will be typing it up for her. if anyone else is interested in instructions please pop your email details on this thread and I'll forward them to you when they are typed up. The finished box dimensions are 5.5" square x 8.25" tall and it is constructed from sheet of A4 card so easy to piece together.

Anyhoo I have made a slideshow of all the flaps in the card with all the gorgeous details below.

The main card is lilac cardstock from the Papermill. The silver paper has been punched with my Martha Stewart doily punch. The ribbons are from my stash from various sources. The silver filigree hearts are charms. The tiny lilac flowers and the roses are from Ebay, the diamante centre flowers at the top of the cake and on the lid are from the bridal section of M. Latifs in Birmingham. All the peeloff stickers are from Papermania/Docrafts. I have used rubber stamps for the top of the box, the wedding cake and the bride and groom image all from Docrafts. Sakura glitter pens have provided the coloured details and I decoupaged the image on the box lid by stamping 3 times and mounting the layers with 3D foam.

I have missed out on the blog challenges over the last few weeks so have a lot of 365 Cards challenges to catch up on, but I have loved making this card. I used to get a fair amount of commissions whilst working at Amtrak as many people would ask me to make their special cards. Although I love being creative in general, my absolute favourite thing is to make cards for a special reason and a wedding definitely counts as being a special reason.

Luckily for me, the current Caardvarks challenge is to make a new bridal or baby shower card or item. I'm hoping I might be very lucky and win a prize with this little beauty. Also Sarn's current forum challenge is to make a shaped card so I'm adding this over there too. On of the recent challenges for 365 Cards Day 144 was to use 2 different methods of adding dimension to your card. I have a decoupaged lid and the whole of the inside is 3d so has a tremendous amount of dimension.

I have also linked this to the wedding themed challenge #42 at Rosie Dee's