My Wonderful Followers - Thankyou :)

Showing posts with label Commission. Show all posts

Sunday, 8 May 2011

Rub a Dub Dub #2


First of all Happy Mother's Day to all my friends not in the UK. Goodness only knows why we can't have it all on the same day all over the world though, doesn't make any sense to me.....

This card is a variation of one I made in March for my MIL for Mother's Day. A house guest of ours saw it as I was blogging it and asked if I would make a card for his Mum. He is from South Africa and would be sending it to her by the postal system so I said I would adapt the design to make it less prone to get damaged in transit.

The fabulous image is called Rub-a-Dub-Dub and is designed by Stitchy Bear. You can purchase it in the Stitchy Bear store here

The image has been coloured with Promarkers and I have added some stickles glitter and Papermania glitter dots to highlight some of the bubbles and added some to look like there were bubbles that had spilled out of the side.

The blue paper is from a big QVC Colorbok pack and I have added ink to the edges of this and the paper too. I made the banner from scraps of card and added rub on lettering. I have strung the flags onto white wool and 'pinned' it up using Craftwork Cards Candi.

The Mother sentiment is a Sizzlits die I bought in the sale last year. I think it cost me just 49p and I knew it would come in handy. I cut it in blue 1st and then layered a white one on top adding some little black dots and a gem on the butterfly. The rest of the sentiment was made up using the rub ons.

Our friend Jean was delighted with it. We are not sure if it has arrived yet so keeping our fingers crossed. By all accounts things go missing in the post all the time in S.A. so hoping that this gets through to her okay :)

I'd like to enter this card into the following challenges (in Alphabetical Order):-

Friday, 2 April 2010

Valentine Commission

I was commissioned to make a card for one of Paul's work colleagues. I was given a very specific brief by the customer, down to the layout, the type of flowers and the writing. It was rather nice to have the decisions taken away and for a client to have such a good idea of what he wanted.

I started with Calla lilies which he wanted to be in a silver wedding bucket. I made this using silver card with a border on the top cut using the Fiskars Threading Water punch. The bucket is double sided as he wanted a window so I needed it to look nice at both sides. The flowers are sandwiched in between the 2 layers and spaced using 3d foam squares.

The aperture was cut using a Nellie Snellen die, with a red frame cut to go around it. The lettering was a combination of a Cuttlebug alphabet for the lower case and a Sizzix one for the uppercase and was cut from DCWV cardstock. Gems were added from my stash.

Luke was happy with it and I believe his good lady was too. Happy customers, just how I like it.

Thursday, 6 August 2009

New Baby Sidestep Card

My Mother in Law has asked me to make a card for a new baby girl for a friend of her's who has moved to Canada. She asked me not to make it too big or heavy as it costs a lot to post.

My friend Sarn recently made this style of card at a cardmaking class at The Glitterpot and shared the pattern of how to make it. It uses a piece of card 6" x 12" but as I don't buy much card of that size I decided to alter the sizes slightly and make it fit a standard sheet of A4. A little tweaking later and I'd altered it to fit.

The main paper is by Doodlebug (now only got a small piece left, boo hoo) The paper on the second layer is from The English Paper Company and the spotty one at the back is by K & Co. The cardstock stickers are by Doodlebug, the baby is a photo realistic sticker from MAMBI and the welcome to the world banner is from the same pack. The New Baby sentiment is from Lets Make Cards, the epoxy bubble message is Paperchase and the silver teddy peel off is Papermania.

I really like this style of card and will definitely be making more of this shape. It looks really effective yet is quite easy to do once you know where to cut and fold.

Sunday, 2 August 2009

A Wedding Commission

My goodness, I have been a bad blogger lately. Since starting my new job on the 20th July I haven't made any cards but I have been working on this commission. I have been planning and making it most nights after I have been at work and had my tea. I have loved making it but have to admit I am glad it is finished so I get on with making other beautiful things.

I made a card like this last year for a work colleagues wedding and one of my friend's Karen asked to do something similar for people who are getting married in Sorrento in Italy. What a glorious setting for a wedding :)

The brief was to use colours of lilac and silver. I couldn't find my scribbled down instructions from making it last year so had to start from scratch. One of crafty buddies Jenny has asked for instructions so I have written them down stage by stage and will be typing it up for her. if anyone else is interested in instructions please pop your email details on this thread and I'll forward them to you when they are typed up. The finished box dimensions are 5.5" square x 8.25" tall and it is constructed from sheet of A4 card so easy to piece together.

Anyhoo I have made a slideshow of all the flaps in the card with all the gorgeous details below.

The main card is lilac cardstock from the Papermill. The silver paper has been punched with my Martha Stewart doily punch. The ribbons are from my stash from various sources. The silver filigree hearts are charms. The tiny lilac flowers and the roses are from Ebay, the diamante centre flowers at the top of the cake and on the lid are from the bridal section of M. Latifs in Birmingham. All the peeloff stickers are from Papermania/Docrafts. I have used rubber stamps for the top of the box, the wedding cake and the bride and groom image all from Docrafts. Sakura glitter pens have provided the coloured details and I decoupaged the image on the box lid by stamping 3 times and mounting the layers with 3D foam.

I have missed out on the blog challenges over the last few weeks so have a lot of 365 Cards challenges to catch up on, but I have loved making this card. I used to get a fair amount of commissions whilst working at Amtrak as many people would ask me to make their special cards. Although I love being creative in general, my absolute favourite thing is to make cards for a special reason and a wedding definitely counts as being a special reason.

Luckily for me, the current Caardvarks challenge is to make a new bridal or baby shower card or item. I'm hoping I might be very lucky and win a prize with this little beauty. Also Sarn's current forum challenge is to make a shaped card so I'm adding this over there too. On of the recent challenges for 365 Cards Day 144 was to use 2 different methods of adding dimension to your card. I have a decoupaged lid and the whole of the inside is 3d so has a tremendous amount of dimension.

I have also linked this to the wedding themed challenge #42 at Rosie Dee's


Friday, 13 March 2009

365 Cards Day 3

A very good friend has asked me to make a card for a 60th Anniversary as he couldn't find anything special in the shops.

I wanted to do something with linking 2 hearts together so started by cutting 2 heart shapes with a Fiskars template and sewing lace to them. The card is a pearlescent champagne colour I used a HOTP gold lace vellum, backed it with a pink DCWV cardstock and added a strip of textured card from a QVC Dawn Bibby kit which has Happy Anniversary foiled with an oil on water effect. The sentiment mat also came from this kit and I cut it into a heart shape to match the theme.

I wanted to incorporate Pearl's name as I thought this would make it more personal so I made a layered flower with 3 assorted Primas,  a pearl headed pin, a pearl shell button and tied a tiny ribbon through the holes. This makes the card fit in with Day 3's trio challenge at 365 Cards. I am loving how much more creative this blog is making me with my card making. I love being able to combine their challenges with the card sketch sites and it is spurring me on to make more cards. Pam, thank you, you are a goddess !!

Various bling has been added to fit in with the Diamond Wedding Anniversary theme and all alphabet peel offs are courtesy of Papermania.

I love this card, I am very proud of it. It has a lot more depth than I would normally put in a card. I always feel a piece of me goes into every card I make, I call it a smile in an envelope. As a complete romantic I am honoured to have been asked to make such a special card and hope they appreciate the love that has gone into it.

Saturday, 25 October 2008

Matts 30th Birthday

This card was made for a commission for a friend of ours who was turning 30. I was asked to encorporate some of his favourite things in it, A Team, Star Wars and Spurs football team.

I'd seen a tutuorial on YouTube of how to make a diamond fold card and I wanted to have a go at one, but the tutorial made the card quite small. I used a sheet of A3 card and it came out 6" square.

I used Google to get some images suitable for the card and as soon as I saw the Star Wars one I KNEW I had to use it as it is a 30th cake with all the figures around it.

Really pleased with how it came out, looks spectacular and both the giver and receiver were delighted with it.

Tuesday, 19 August 2008

Christening Bookatrix

I had been commissioned to make a card by a work colleague for a baby's Christening. I presented a number of different design options and the one she chose was a bookatrix design.


The patterned paper is a freebie one from a magazine. The mini bible I made myself from chipboard covered with pearlescent paper, thin card pages and ribbon. The cross is a peel off. The ribbon is from my stash and the likkle baby is wearing a ribbon nappy.


The box is edged in the same blue ribbon. The frame is from a sticker pack from Poundland. This is laid over a piece of card 2which has been run through a Cuttlebug embossing folder. The chipboard sentiment is from a DCWV baby chiboard sticker pack and the sentiment is a Kanban kit ftom QVC.

Wednesday, 30 July 2008

60th Birthday Bookatrix

I have been commissioned to make a card for a 60th birthday for one of my work colleagues. They had seen a bookatrix style one that I had done and asked me to make one like that.


She has a family crest and I was aked to encorporate that into it if I could. They have clubbed together and bought her some crystal champagne flutes which have been engraved with the crest.

I was unable to get a decent sized image so couldn't do what I had intended with it so made a small 'badge' which was covered in Ranger Glossy Accents.

Brads are Papermania, star paper is HOTP and the stamped images were from a swap I did with a forum friend ages ago. I used some glass beads and glamour dust to accent the champagne glasses and the images were coloured with H20's

The box lid I decorated by doing a larger version of the shield part of the crest. I pieced papers together and used satin puffed hearts for the emblems. The box is finished with a gold ribbon around the edge.

Tuesday, 22 July 2008

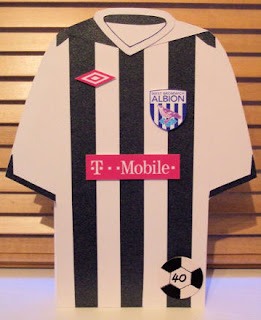
WBA 40th Birthday card

I had been asked by some work colleagues to make a cards for one of the guys who is turning 40 and it need to be a West Bromwich Albion theme if possible.

There will be about 40 people signing it so I needed to make it quite large, the finished size is just under A4.

I have a template for a smaller square card so I resized it. It took a couplr of attepts to get it right as I tried to hinge it at the top and it wouldn't stand up so in the end I did a concertina fold on the left hand side at the bottom.

The base card was white so I layered strips of navy pearlised paper for the stripes using photo references from the internet for placement. The club badge and advertising are printed off onto photo paper and mounted on 3D foam. The ball is a Sizzix die cut and the 40 was written by hand.

The back of the card was embellished with a number panel I printed and the lettering is chipboard from a QVC TSV.

I didn't have any A4
envelopes and wanted to make it a bit posher anyway so I decided to have a go at making a gussetted bag/envelope for it. I used 2 sheets of 12 x 12" DCWV textured card, laid some more stripes on the top and a WBA badge that I had previously printed to do a different style of card.

I am really pleased with how this came out and Paul just said WOW! Can't get better than that.

Sunday, 20 July 2008

Naval 60th Birthday

I was asked to make a birthday card by one of my colleagues for a gentleman who had been in the navy.

She obtained a photo of him which is the only one of him in existence from his Naval days. It was in pretty bad state so my wonderful hubby used his Mac to colour in a huge crease, fix the edges and recolour it. I am so pleased with it, he did a fantastic job.


Looking on the internet I found the emblem for a Chief Petty Office which I printed off onto photo paper. I used ribbon from my stash for the spine of the Bookatrix and the gold braid is from Docrafts.

The Navy paper is one I made myself from repeating an image I obtained from the net. This is printed using a 50% transparency setting onto hammered white paper. The sentiments were printed onto pale blue vellum.

The box is embellished using peel offs from Docrafts, papermania and a vellum sentiment.

Denise absolutely loved the card and cand't wait to give it to her friend next week.

Wedding Card & Box

My colleague Christine asked me to make a wedding card for Helen from the office staff she works with.

I used embellishments from various sources for the front. The dress and the heart is Papermania, the velvet feeling tuxedo is from Woolworths, the glitter sticker is from Mambi with an epoxy sticker over the top from LMC. The sentiment sticker at the bottom is from a wedding pack from Poundland.


Inside the card I did a pop out stylee sandwiching burgundy
paper with peel off hearts on it. I also used Docrafts peel offs to add detail to the inside. There is also an extra couple of pages for her colleagues to add their sentiments to it.


The box is decorated using a wedding cake die cut from a Poundland pack. The heart and sentiment are from the Papermania stickers. Peel offs are from my stash.

Chris loved the card and so did Helen.

Wedding Table Plan

My colleague Helen asked me to make her a wedding plan as she couldn't afford to pay the money professional companies were asking. She did her own stationery using Confetti but didn't like their DIY wedding plans.

The finished size is A3 and I used Burgundy and white for the plan throughout.

The heart punck is from Docrafts and the ribbon and bows are from my stash.

The burgundy mats are mounted on 3d foam. I am really pleased with how it turned out, it looks way to professional to be something I did!

Saturday, 19 July 2008

Football Birthday Card

I was asked to make a birthday card for someone who is a Liverpool FC supporter. I made a card similar to this before and was very pleased with how it turned out so based it on that.

I printed the badge off onto glossy photo paper as I like how much more vibrant it makes the image. This is matted onto red and black card to make the design pop out from the background.

The backing paper is printed onto hammered paper from staples with a 65% transparency setting. The banner is from my stash and the football is a Sizzix diecut.

I have just heard back that Martin's friend loved his card so that is another happy customer :)
One of my bestest friends at work Laura was leaving to have a baby and I knew I would be the one to make her leabving card.

I bought the template for this baby book from Craft Central a couple of months ago. As soon as I saw it I knew it was perfect for her.

As we didn't know the expected sex of the baby I decided I would alternate the blue and pink colours throughout. I am especially pleased with this is it made the individual letters stand out so much better.

There is a slideshow below of the individual pages. I have used papers and embellishments from my stash and they have come from various manufacturers. I basically just gathered together all my baby stuff and just went for it. ! There are papers from Doodlebug, DCWV, magazine freebies and baby kits from Poundland.

Embellishments are as follows

- Epoxy stickers from Paperchase, Poundland, LMC,
- Chipboard from QVC DCWV TSV, wonderful themed drawers set which just happened to have loads of baby stuff, YAY!!
- 3d stickers from Poundland
- Printed embellishments courtesy of printable scrapbooking freebies from the tinterweb.

Printed ribbons were a recent purchase and many, many offcuts were tied to the book rings on the spine.

I spent a long time getting everything together for this project and I am REALLY pleased with how it turned out. Laura means a hell of a lot to me and I wanted to do something very special for her. She absolutely loved it.

Wedding Explosion Box

One of my work colleagues Helen got married yesterday and I made an exploding box for everyone to sign.

I knew what I wanted to make but wasn't sure what the diemensions would be and also whether it would work so I did a trial 'cake' first. The proportions of the cake were wrong so I am glad that I did it.

Each teir of the cake is a cylindrical box which were stuck together with strong glue. The wedding colours were burgundy, cream and gold so I used floral embellishments in those colours and some lovely loopy ribbon that I had. All embellishments are from my stash.

The bride and groom were working on a tight budget for the wedding and loved my cake design so much that they decided to display their actual wedding cake that way too. I was extremely flattered.

All the images for the box are in the slideshow below.

Saturday, 5 July 2008

21st Birthday

I was commissioned by one of my colleagues to make a card for a 21st Birthday.

The young lady in question is very girly and loves all my cards so I used one of my favourite Sizzix dies to make the dress, handbag shoes and gift box. The paper is from an Amethyst Papermania pad. I accented the swirls with a Sakura glitter pen. The embellishments are also Papermania. The swirl at the side is a long Sizzlits die and is cut from self adhesive metallic paper with a texture. It was the first time I have used this die and I am pleased with the results.

The 21 is chipboard from a QVC TSV and the Happy Birthday banner is a 3d embellishment which was a magazine freebie.

I am very pleased with how this turned out and love the swirls :)

Saturday, 28 June 2008

Luvvy Duvvy Birthday card

Whilst in the middle of a very busy week commission wise one for my work colleagues asked me to make a card for his wife's birthday and I had one day's notice !! My goodness did I give him stick about that. He said he din't think I would be that busy !!

I used a rubber stamped image by Penny Black which was coloured in with Marvy le Plume pens and a clear Sakura glitter pen. The brad is from a Dovecraft assorted embellishment pack.

The paper at the bottom is from Paperchase and the red hearts are flocked so feel lovely. Paperchase do some lovely wrapping papers and I find they can transfer very well to being used for cards. The sentiment at the bottom is recycled from an old birthday card. I have a few friends who give me their old cards to use anything I can from them. It's a great way to get some nice little bits and also recycling is good fot the environment isn't it ?

The ribbon is from Anita's and ribbon brad is Papermania. The card banner is from my stash.

3 Year Old's Birthday

This card was made for the son of a friend at work.

He is mad about Teletubbies at the moment so I found a picture on the internet and decoupage layered it. The name banner was made using stickers mounted on card and then 3d foam.

The backing card is from a DCWV glitter stack, I thought the bright colours were perfect for this image. The sentiment is from LMC

His family loved the card and I must admit I am quite chuffed with how it turned out

Saturday, 21 June 2008

Graduation Card

My work collegue Andy asked me to make a card for his Girlfriend to celebrate her completeing her degree.

I found this quote that Bethany did on Elegant Word Art. Please do go over to her blog as she has some wonderful word art she creates and even does requests. I love crafters as they are the most giving of people and are genuinely nice.


The mortar board is a 3D decoupage that I printed off onto photo paper (I have no idea where I got that from) The tassel was recycled from a Christmas card and is held on with a small Papermania brad. The background paper is from a K & Co embossed paper pad I have had for a mighty long time and never used. The scroll was made from some parchment effect card I had which I have torn and inked the edges to age.

As Andy's writing is awful I thought I would do something a bit special for the insert too so I made it look like a diploma and used some HOTP unmounted rubber stamps for the scroll edges. I bought these from QVC in a TSV last year and it is the first time I have used them. I was very impressed with how clear an impression I got from it.

Helena absolutely loved her card which makes me happy :)

Saturday, 14 June 2008

Another Baby Box

This is the last baby box for a while and a little bit different. My colleague Sue wanted one for her Sister who lives in France (I'm spreading into Europe now LOL)

Not knowing the sex of the baby she said she liked mint, chocolate and cream together, so thinking mint choccy chip ice cream I set to work.

On the lids of these boxes I have been using little kits from inside a TSV that I got from QVC, but no longer had any neutral coloured ones left. I had purchased the large 'B' Sizzix die previously and had a go at doing it myself. I used tags from my stash and a brass charm and think it has come out really well. I used chocolate brown velvet ribbon for the edge and it has a touch of luxury to it.

Sue wanted to encorporate the other children in the project, welcoming the new baby into the family hence the photos of brother and sister.

Embellishments used were from the following - Prima flower, Sizzix Die, Let's Make Cards, Papermania brads & peel offs, rubber stamps, printables off the tinterweb, & Sizzlits teddy die.

The slideshow below has all the images from this project.